Back to Safety Center Main Menu
Creating an Event
In Safety Center, you can set up plans which can include up to 18 events in each. A plan is similar to a large emergency binder and the events are the chapters or tabs within that binder that focus on topics such as Weather Emergency, Injury, or Suspicious Package.
Please note our security protocol will have a 30 Minute Lockout Period when working within the FacilityDude Safety Center online portal. Please be sure to update any work within 30 minutes of clicking the Edit button on any page of the portal.
If you are timed out you can take the following steps to recover your work:
- Select the Back button in your browser. This should take you back to the page you were originally working on.
- Click the Edit button.
- Click the Source button to change the text into HTML.
- Copy all of the HTML Code to your clipboard and log out of the Safety Center Online Portal.
- Log back in to the Safety Center Online Portal and select the event in which you were working.
- Click the Edit button and then select the Source button.
- Paste in the HTML code from your clipboard.
- Click the Update button and your work will be saved.
Watch the Video Tutorial:

How to Add an Event to a Plan
- After you have selected the plan you want to work in, click on the Event tab and then click on Event Sequence.
- Click the Add Event button to add a new event to the list.
- Click the Edit button next to that new event to add information to the event.

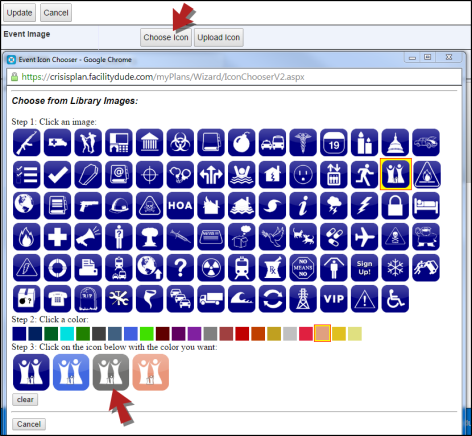
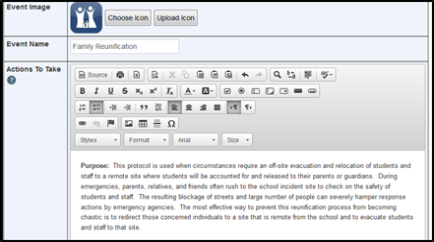
Event Image - Choose an icon for this event from over 80 options in the library or upload your own.
- Click the Choose Icon button to open the Icon Library pop-up window.
- In Step 1, select the image you want to use for this event.
- Pick a color in Step 2. You can click multiple colors to see what the image looks like in each.
- When you have found a combination that you like, click on the icon in Step 3 to select it.
- You can also upload your own icon if you choose. Just make sure the image is 64x64 pixels or smaller.
Event Name - Enter a name for this event in the field. This event name will appear under the icon on the mobile device screen.
Actions To Take - This section is where you will type or cut and paste the text that you want to appear in the app. The editor in the online portal works similarly to a word processor. You can format your text with different colors, fonts, and styles. You can create hyperlinks, make actionable phone numbers, add images and tables, and more.
If you are pasting text from a Word document and wish to keep the original formatting, use the Paste from Word option ( ). This will keep the text formatting intact, but may prevent you from making adjustments to it in the editor.
You can also use the Paste as Plain Text option ( ) to strip out the original formatting so you can add new formatting in the editor.
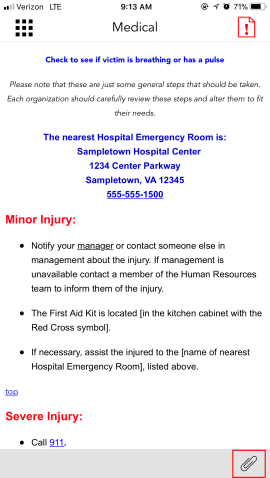
Keep in mind that the content you currently have in paper form will look very different on a smartphone. You may have wide tables or other formatting that will not translate well to a small screen. You will want to reformat your content so that it is easy for the user to scroll up and down through it and limit having to scroll side to side. Also consider adding links at the top of the page that will jump the user to certain parts of the event, especially if the event contains a large amount of content. This will reduce scrolling and help the user get to the information they need faster.
Action Image - This image will appear as a header at the top of the event screen on mobile devices. Make sure that the image is no more than 300 pixels wide so that it will fit on most smartphone screens. A width of 297 is recommended for the image to be centered on the screen.
- Click Upload and browse for the image file.
- Select the image and click Upload Image.
- Click Accept.
Diagram - You can upload one file attachment per event in the Diagram section. These could include a picture, PDF of building maps with evacuation routes and/or critical equipment locations, handbooks, a poster or infographic, Word document, or Excel spreadsheet, etc. All diagrams are displayed behind the paperclip in the event on the mobile device. If you include a diagram on an event, you may want to instruct users that there is more information attached in the content of the event icon. There is not a specific file size for attachments; however the entire plan cannot exceed 12MB.
- Click Upload and browse for the file.
- Select the file and click Upload Diagram.
- Click Accept.
When you have added the information and images needed for the event and are satisfied with the formatting of the text, click Update to save the event to your plan.
